Date: Thursday, September 30, 1999 8:44 AM
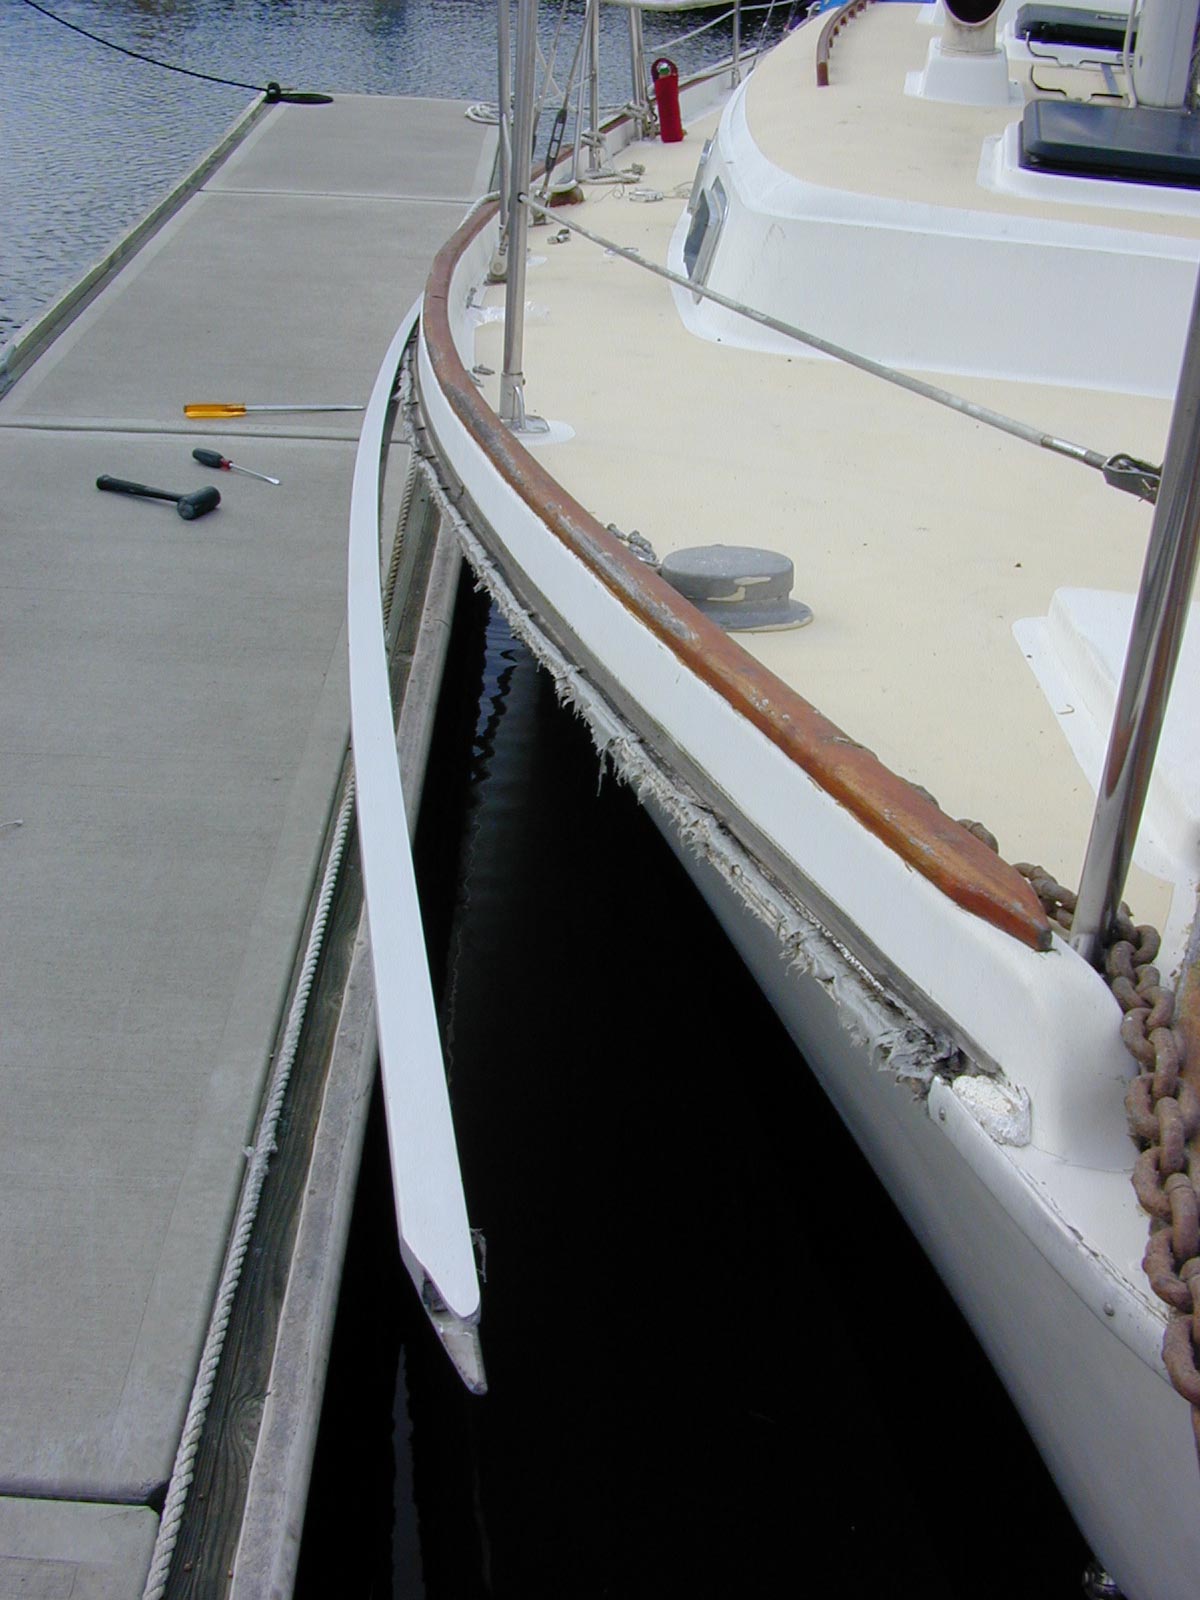
The Bundy's last five days involved removal of the aluminum rails which surround the vessel.
The following steps are involved.
1. remove sheet metal screws, then remove each end bolt located at end of each rail section. The rails are spring loaded under pressure so have someone hold the rail as you remove the bolt and nut. The rails are heavy, you'll need to tie a line or have two people available to catch the rail.
2. Clean all the old caulking out of rail, and clean old caulking off the joint.
3. lightly wire wheel the old caulking off the joint and teak strip. Check teak strip for any cracks and replace any teak which may be soft or cracked.
4. Use Acetone to clean the surface on the joint and inside of aluminum rail.
5. Inspect all 1/4 inch bolts, tighten each as required, replace any suspected of corrosion.
6. Use 5200 to seal the joint on top and bottom sealing the bolts and nuts, let dry overnight. Install rail with one bolt and a couple of screws. Apply 1 inch masking tape to gell-coat and rail ahead of area where you will apply 5200, this makes it easy to get a professional looking job.
7. Gently continue to work in the 5200 bead and sheet metal screws into the teak joint, at about the halfway point attach the other end with the bolt and nut, do not tighten up all the way, you still need a little space between rail and gel coat for the 5200 bead. Then continue applying bead and machine screws, and masking tape moving forward, and last tighten up bolts to adjust for proper clearance and alignment of rails to one another. Remove the tape carefully, touch up any areas that need it, then mask the bottom half of rail and apply 5200 to it to seal the rail all around. This will give you a water-tight rail.
Date: Fri Oct 1, 1999 2:10 pm
Don & Brenda's good account of rebedding the rub rail reminds me that I should at least mention a big change I made on Spirit, ASII #119C. Spirit was badly damaged when she blew off her mooring in an October gale three years. Much of the damage was on the port bow, where I'd catted a 20# Danforth over the bulwork. The anchor smashed repeatedly on a piling, tearing the port rub rail loose and bending it beyond repair. The aluminum extrusion is no longer available: the whole rail, pt, stbd, and transom had to be replaced. Kent Richardson, who was doing the (extensive) fiberglass work, and I decided to replace the rail all the way around with a very heavy white vinyl rail (the largest size available, to cover the hull-deck joint) with a 1" polished stainless steel rubstrake. The plastic was very stiff and tough to work with warming it with a shop heater helped): the transom piece was the hardest to fit by far. We packed the rail with 5200 and caulked the (inevitable) gaps with more of the same. The job came out beautifully and, at the risk of condemnation for Seawind II heresy, I personally think that Spirit looks better with her white and stainless rub rail than she did with the classic aluminum monster. But chacun à son. . . .
I don't know if this is of interest to others: clearly, if the old aluminum rail is in good shape, rebedding and reattaching it makes the most sense economically, and also in terms of maintaining the original design integrity. But if anyone needs to replace the rubrail entirely, as I did, I'd be glad to provide more informtion, photos of our installation, etc.
Date: Mon Oct 4, 1999 4:47 pm
Don and Brenda wrote a very complete description of removing/replacing the aluminum rub rail, and cleaning the hull-deck joint. Instructions written by people who have done the job are always very accurate:
"The rails are heavy, you'll need to tie a line or have two people available to catch the rail."
However, our approach to this job differed in one respect. They wrote: Re-install the rail with one bolt and a couple of screws. Continue to (install) sheet metal screws ...at about the halfway point attach the other end with the bolt and nut."
As Don and Brenda said, the rail is spring loaded. We found if you followed the procedure they describe the unattached part of the rail bowed out and, in Tim's words, "you had a hell of a job to get the rail to align tightly with the joint".
We did this work with the boat in her slip in the marina (we had finger piers on both sides of our slip). We supported the rail by tying it to the pilings. When the rail was completely free we would swing it onto the pier. The reattachment process was to swing the rail back into place and attach the first bolt and nut. We continued to attach screws to the middle of the rail. Then we put a 4 x 4 piece of lumber vertically between the rail and the finger pier. We then used winches and line to pull the boat and 4 x 4 against the finger pier, forcing the rail against the hull deck joint. We would "let the boat off a little" and move the 4 x 4 and then tighten up again as we ent
forward. We then continued to insert screws, nuts and bolts until the end of
the rail.
Date: Fri Oct 27, 2000 12:03 pm
I've already replaced the famous aluminum rubrail with heavy viny and SS rubstrake. Since the cost of teak and SS seem close (ca. $1500), it seems more a matter of taste and cruising styles than of cost
Date: Fri Sep 7, 2001 12:10 pm
If you really want a boat that is so dry you can have nothing but dust aboard, try this:
Remove the aluminum rail, do one side at a time and begin at the end and work aft or forward because the rails want to strighten out bigtime. Each screw that is in the rail not only holds the rail on but in most cases goes through the hull, each screw becomes a leak. Also at the end of each rail there is a bolt and nut which is drilled through the hull. After removing these, you may find very wet wood strips, these are screwed into the 5200 sealant between the upper and lower sections. Remove any wood that is soft and replace with like kind. While you have the rail off,
check each 1/4" vertical bolt for crevice corrosion, replace each as needed. Then when replacing the rail, use 5200 on each screw that you put back in place, and before putting the screws back, grind off at least 1/8" of them, this will prevent them from penetrating the hull inside,
don't forget to 5200 the nut and bolts at the end of each piece. Finally from the inside, using a 2" wide piece of fiberglass tape, go over all the old screws holes that protruded from bow to stern. This will put a stop to a great deal of your leaks and make your boat dry in the worst of weather. This is the best thing we've ever done to our SW. The engineering for this joint was great, the skills used in applying it was horrible. I've read articles indicating how great the carpentry was at allied, but never saw anything written saying how great the men working the deck joints were. Fortunately it was made so one can repair it properly.
Oct 10, 2001
Anyone taking to the high seas should be certain of the vessels hull to deck joint. During storm conditions much water can be taken in through this joint if it is not in good condition. Suggest that you take a good look at that before heading out into the deep blue. At most it would take a few days to remove the aluminum rail, check all the 1/4" bolts, replace any wet or leaking area, and replace the rail sealing it with 5200. The piece of mind is well worth it, and its great when its blowing outside to go below and find it warm and dry.
1324 Jan 9, 2002
One of the primary reasons I have been interested in the ASII is the description of the hull-deck joint as "A substantional joint, with sealant on the hull flange, a piece of teak, another layer of sealant, and the deck. Outside the joint is fiberglassed over, and there are about 100 through-bolts."
Two questions:
Is this description accurate?
Has anyone ever experienced leaking in this joint?
Wayne Saewyc
Jan 9, 2002
While the description is the one that appears in the literature and may have been accurate for early boats, it is not what we found on our hull 101. We purchased this boat new and a substantial joint leak developed on a passage from NYC to the Chesapeake. The water literally cascaded into the boat everytime it hit a wave (we were beating upwind). The boat hit the wave and this heavy mist sprayed into the forward bunk area. The temporary solution (since we were on our way to the Caribbean) was to externally seal with 5200 along the Aluminmum flange that forms the joint. The permanent fix was to pull the flange, clean the joint, glass over, redrill the bolt holes and afix the AL2 flange. We made do with the 5200 for several years until we got the boat back to where a major project could be undertaken. There was no teak batten and the joint was not glassed over. Some years ago we ran into another Seawind(I don't remember the name of the boat or the owner's name, just that he was a pilot that annual took his boat single handed from the Chesapeake to the Bahamas (Green Turtle - White Sound) and he had a similar finding with the joint on his boat. It could also be that when the new owners took over in about 1981 they went back to the original spec, but ours definitely was not done to spec.
Sharon
Silver Spray 101K
Jan 9, 2002
The hull-deck joint on SW75 does not have a teak strip in the joint. The screws holding the aluminum rub-rail are screwed into the joint and cause leaks, particularly after the rub-rail has rested against a dock or piling, jamming the screws in further. I believe the teak strip was inserted in the later boats as part of the effor to raise the deck mold, so there is more headroom at the entrance to the forward cabin and to avoid the small step-up there.
My hull deck joint leaked a lot. The rub-rail was eventually replaced with a teak one, but it was only after the number of bolts was doubled, adding a new one between each old pair, and 5200 applied to the interior of the joint that it became watertight. To do this try to clean the interior of the joint as best is possible then smear 5200 into the joint. A caulking gun will not fit over most of the joint, you must smear it by hand, and there are some gaps in the way of bulkneads. But as far as I can tell, the hull-deck joint no longer leaks.
Dick Weaver SW75K
1327 Jan 9, 2002
The hull-deck joint on SW75 does not have a teak strip in the joint.
The screws holding the aluminum rub-rail are screwed into the joint and cause leaks, particularly after the rub-rail has rested against a dock or piling, jamming the screws in further. I believe the teak strip was inserted in the later boats as part of the effor to raise the deck mold, so there is more headroom at the entrance to the forward cabin and to avoid the small step-up there.
My hull deck joint leaked a lot. The rub-rail was eventually replaced with a teak one, but it was only after the number of bolts was doubled, adding a new one between each old pair, and 5200 applied to the interior of the joint that it became watertight. To do this try to clean the interior of the joint as best is possible then smear 5200 into the joint. A caulking gun will not fit over most of the joint, you must smear it by hand, and there are some gaps in the way of bulkneads. But as far as I can tell, the hull-deck joint no longer leaks.
Dick Weaver SW75K
=============
Wayne-
I had a leak into the galley locker port side aft that delaminated the countertop and soaked the icebox insulation between the box and the hull. After rebedding all deck hardware port side and not stopping the leak (which I could never see happening from the inside anyway) I figured it had to be the deck joint. On my '79 Seawind the deck drains thru a scupper in the gunwale at its lowest point. I guessed that the volume of water funneling thru this point and down onto the rub rail was a likely spot for a deck joint leak. Sure enough when I removed the port section of rub rail I found the problem. From a point just aft of the aft bulkhead forward to about 2 feet aft of where the rub rail is thru bolted to the hull the hull/deck joint was cracked apart where each screw had attached the rub rail. There was NO teak or wood strip between the deck and hull flange. The rub rail was just screwed into this joint with large screws whose holes weren't pre-drilled either. I could actually see daylight thru the joint just below the deck scupper! The deck was simply caulked to the hull flange and thru bolted with 1" long 1/4 " bolts. Its highly probable that if you are looking at an older model ('76 or so) you wont have this problem. Don and Brenda Bundy have hull number 122 (I think) and their hull/deck joint seems to be as described in PS. My hull number 113 is an aberration I guess. Anyway I repaired the joint area with epoxy and extra thru bolts. I plan to glass over the entire joint from the inside which should eliminate the joint as a source for future leaks.
Hope this helps... Bill k113
1331 Jan 10, 2002
We have hull #129 and when first obtained the joint did leak. Prior to taking the vessel to the Bahamas, we removed the aluminum rail, and cleaned the area around the joint, then inspected carefully the �" SS bolts. Replaced two bolts that had some corrosion, replaced a two foot length of teak wood strip and replaced the Aluminum rail the next day, filling the void between the hull and rail with 5200 top and bottom.
Since then we have not had a single drop of water penetrate even under adverse weather conditions that completely immersed the hull up to the top deck at times. The description seems accurate and it also required two days to do the work.
Don
1362 Jan 15, 2002
At one time I attempted to repair a leak in the hull deck joint. I tried to remove the aluminum rub rail that covers the joint. However, the joint had been sealed with a caulking, probably 5200. After removing the screws holding the aluminum I found that I would bend the aluminum if I simply pulled it away from the hull, the 5200 had a good grip. Have any others faced this challenge and how was it handled?
Phil
1363 Jan 15, 2002
Use a hair dryer to soften 5200 and it will let go. That stuff is tough...
Silver Spray
1364 Jan 15, 2002
Concerning the hull/deck joint. Did you replace the aluminum rail or reinstall the original. If replaced, where did you buy it?
Rick
1371 Jan 15, 2002
Replaced the original as it was in excellent condition. I don�t know of the rails original source.
Don
1372 Jan 15, 2002
If 5200 was used, then try either a hot blade knife which softens the material or a heated putty knife which will do the same. If you can insert a hacksaw blade at an angle that may work as well
Good Luck,
Don
1403 Jan 24, 2002
One product you can use to stop any internal leak at the hull deck joint is Bondo-Glass, a fiberglass reinforced filler material. First sand lightly the area if previously painted, then clean with MEK, mix up a batch of filler and spread over the area of the hull deck joint, this will effectively stop the leak from the inside and allow you to proceed with repairs.
Don
7131
Nov 6, 2006
Just thought I'd share some info on my current task of re-sealing my hull-to-deck/rub rail. After reading what has been written so far about this project and then actually starting it, I made a few discoveries. As you can see by one of the images attached, my joint does not have the teak strip between the hull and deck which has been described by others. I don't know when they started using it, but they didn't on my hull, #28. Has anyone else with a hull number close to mine found the same thing? They used a non-hardening, very very sticky bedding compound to seal the joint, bolts and screws. (If they had totally filled up the cavity of the rub-rail with this stuff, I'd probably not have to be doing this.)
Where the top edge of the rail touched the hull they used some sort of material (maybe rubber) that probably acted as sort of a gasket or was just there to pad or fill any gap between the rail and the hull. The bottom edge of the rail had this same material in one area (about a 4' section a-mid-ships) and the rest they used some sort of caulking. This material had dried out and probably wasn't doing whatever it was originally designed to do.
The rub rail is screwed directly into the fiberglass. They for the most part found the center of the joint and didn't hit any of the the vertical through-bolts although they came real close on a couple of them. The joint seems to open up a bit ( less then the thickness of a thin putty knife) about mid-way between the vertical bolts.
What I thought I would find and what I found turned out to be totally different. I was under the impression that this joint was over-engineered and complex for the builders to assemble. Am I missing something?
I'm currently thinking about different ways of sealing everything back up and will put those thoughts out to you all soon. Any off-the-cuff thoughts or ideas are always welcomed and appreciated.
Steve Dear
Second Chance (#28)


7132
Nov 6, 2006
Steve- Great pic's, thanks! I always wondered what was under there up forward....My hull #113 doesn't have that mysterious teak strip either, I removed an aft section (from the galley to the stern and found just the bolts but NO caulking, pads or anything...
Bill S.
k113
7133
Nov 7, 2006
The earlier SeawindII's were built without the teak insert in the hull to deck joint. The hull to deck joint had through-bolts joining the
deck and hull moldings after 5200 was laid on the mating surfaces. The aluminum extrusion was attached with screws screwed into the joint intself. There was no caulking between the edges of the extrusion and the hull. Any caulking there was inserted by a previous owner.
There are a number of sources of rubrail leaks.
1) If the layup were too weak, there might be a leak in the space between the through-bolts.
2) If there were a shortage of 5200 on the day the parts were joined, there could be too little 5200. Remember that the company often had
financial problems.
3) If the boat bumped against a piling vigorously, the screws set into the joint might be pressed further into the joint, creating a pathway
for water intrusion.
There are a number of solutions to such leaks.
1) Add additional through-bolts between those already in place.
2) Smear the inside of the joint with 5200. Almost all of the joint is accessable. This is a surprisingly effective solution.
3. Replace the aluminum rub rail with a teak one with no screws in the hull to deck joint. I have done this but it is rarely necessary.
When Brax Freeman took over Allied, he made some changes in the SeawindII.
1) He created a break in the bulwark for deck water to flow overboard instead of draining below and out the stern.
2) He inserted a teak strip between the hull and deck moldings. This has the effect of raising the deck a bit. It may have altered the
doorway to the stateroom. I think some boats do not have the little stepup into the stateroom and certainly increased the headroom in the doorway.
I know that Brax had a Seawind of the earlier model with hull to deck leaks which darkened the cabin sole.
If your boat has a break in the bulwark to let deck water flow overboard, it also has a teak strip in the hull to deck joint.
Dick Weaver, SWII 75K