
Date: August 27, 2020
Parko Misko sent a great set of pictures of replacing the bobstay tang at the waterline. Here's his description:
I have Sea Wind hull #89 Cutter. I did that exact replacement over the winter. John at Spartan Marine was really great to work with when I ordered the fitting. It was the large bob stay fitting with the 5/8 clevis pin. The hard part was extracting the old bob stay tang. It is embedded in a polyester resin blob in the anchor locker with a plywood rear side to act as a mold for when they poured the resin in to secure the tang. The entire thing is glassed over as well. It took the combination of a multi tool and a chisel and hammer to chip my way through the resin until I got down to the hull laminate and was able to pull the bob stay tang out. It has "fingers" that we're locked in with the resin which keep the bob stay in place. In my case, the chain plate for the inner forestay was actually another bobstay in the anchor locker which was a very poor design because it intersected right through the pile of chain and to another tang sticking up out of the top of the resin. I removed that bob stay as well and designed a new anchor point for the inner forestay up in the point of the anchor locker near the deck. I'll attach some photos of that as well. I used the same fitting but modified it to fit the application.
After the demolition, I prepped the hull and epoxied in some G10 fiberglass plate that I laminated and made into a wedge shape that fits the bow shape. I then laid up 4 layers of 27oz biaxial stitched glass In varying sizes over the area. That process resulted in a flat area for the backing plate.
Another thing I did while I was in there was design a new anchor locker floor that is self draining because the old "floor" was the resin they poured in for the tang. The new floor has a fairly severe fall forward and only moved the height of the chain pile up two inches which was negligible in my opinion especially because the floor is wider and the pile of chain has more room spread out. It drains through two nostril holes in the bow and so far has worked beautifully!
I've attached photos of the process. The spartan marine fitting fits the Seawind hull perfectly.


Date: Oct 2, 2001 1:28 am
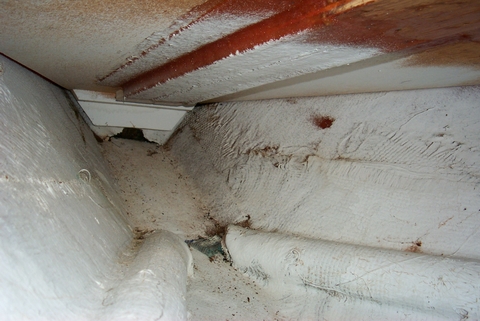
Looks to me like this can't be done without destructive testing (see photo). This was taken under port veeberth. Noticed on some boats used a ss rod bobstay. I don't know if Pickpocket's was replaced or original. This chain arrangement seems a bit heavy for the chain plate used but is
more forgiving of collisions.
Bobstay Access
Bobstay
Date: Tue Oct 2, 2001 11:45 am
The bobstay contains a large attachment piece on each end. This is screwed on and this is where crevice corrosion takes place. To inspect:
1. slacken the headstay till very loose.
2. Remove cotter pins, and pin, then remove the bobstay from vessel. Note: it sometimes helps if someone stands on the platform to remove the tension on the pins while another drives them out. Don't loose them in the water. We use a small wooden dingy so they fall into it rather than
on the water.
3. using a large vise, attempt to unscrew the attachments, heat, liquid
wench, etc.
4. after removal, inspect the thread area looking for crevice corrosion. If found a new SS 3l6 rod will have to be procured and of course the replacement is a reverse of above.
5. This is a better course than having the bobstay unit explode under heavy sail at sea, pulling the entire teak platform up with the pressure of the sails. We do this every 10 years to prevent any surprises.
Date: Wed Oct 3, 2001 12:31 am
The higher res version of that photo (1 meg) better shows that there may be access (I dismissed this before ). The point at the bow is entirely glassed in but has a plywood piece that provides support for the veebirth deck or may also be a cover for the chain plate access. This plywood piece has no visible screws or means of removal. In any case this area is only accesible by humans if the veebirth deck were cut away.
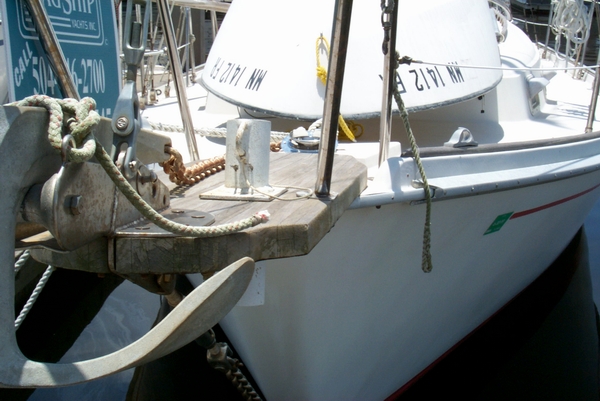
The pipe thru the bowsprit was a homemade anchor Davit ("Was" is now buried in a spare parts bin). Someone fashioned this from 3''CS pipe welded to a 4 1/2''sq plate. The spare 25lb Danforth and chain was hoisted up thru the bottom and pinned until needed. I guess this method was as good as any available in the 70's early 80's. The Danforth now hangs from the pulpit and is destined to be my stern anchor. I now have a 3 1/2''D. hole with no purpose (any suggestions? comical or otherwise?) I do intend to stowe a 33lb Bruce and a 35lb CQR on two rollers on the sprit at the ready. I realize this is a lot of weight on the bow but I anchor out often and like the accessability and safety of this arrangement for sand or mud bot in a heavy blow. The hole provides an oportunity to build a staggered pass thru bow roller arrangement that might leave enough clearence for both anchors and the bobstay turnbuckle, but I may have to remove more
lumber than would be adviseable. Please offer allternatives, photos.
Pulpit
Date: Wed Oct 3, 2001 9:06 am
My V berth deck is screwed to cleats that were glassed to the hull sides. I have removed it with a bit of "finding" the screw heads under the paint. It was not a really bad job. The fun was grinding away all of the fiberglass used to install the tank up there. But there is a very distinguishable lump in the area of the bobstay tang. I suspect that the tang could be removed from the inside with a bit of judicious and painstaking grinding, cutting and carving. The old unit should be left intact so that a duplicate can be fabricated from a 316 grade stainless steel,with similar angles. The removal/installation therefore would preserve the exterior gelcoat. Electro-polishing the replacement should be a very necessary step as corrosion is almost a surety for any encapsulated stainless.
As I have had to fabricate several replacement "rod" bobstays in the shop in Tortola, I have had the opportunity to see that each one that had failed had done so in the area of the machined threads. This phenomena leads me to believe that the stay should better be served by using either chain or wire as a replacement over rod. My suspicions seem to arrive by the observation that anchor and mooring lines often are exerting side pressure on bobstays. The fittings for chain and wire are apparently more capable of withstanding this force. In this is my observation and opinion but the metallurgy would be far more Jack's bailiwick than my own.
Date: Wed Oct 3, 2001 12:52 pm
A year ago I was motoring down the ICW with a friend steering my SWII. I was below, on the SSB chatting with friends when I heard the engine go into emergency reverse. I ran onto deck as the headstay bounced off a bridge! For some reason my friend thought we could slide under a 20 foot high bridge.
The only damage was a small crack in the bobstay fitting, on the fork end that is screwed onto the rod. After thinking about it, as Paul suggests I realized that the bobstay is subject to side loads, so replaced it with 5/16 1x19 wire and two Norseman fittings. The 5/16 matches the strength of the 1/4 headstay given the more acute angle it's on. This arrangement has been very satisfactory.
I considered replacing the pin in the bottom Norseman with a big shackle, since this would be a great place to attach the chain snubber, but decided against it because it's so hard to reach down there if something fouled.