Date: Sat May 29, 1999 7:27 pm
Panache (hull #60) replaced the original fuel tank with a 45 gallon alumninum one.
Date: Thu Nov 30, 2000 1:20 pm
I can't help you on the rot problems above, but my fuel tank also showed rust, essentially as scale in the primary Racor fuel filter, so my yard urged replacement. We had to cut the tank to get it out (Investigate other owners' approach that may have avoided the problem), so we decided with the yard to look at flexible tanks (used in competition motor boats, but not enough long term warranty for diesel use and must stay tight against a smooth liner), then opted for two twin tanks (split along the ship axis) linked by a 2" U pipe under, for common filling and also drainage purposes (but we finally did not put a drain valve there). We also gained a bit of capacity forward and aft to have 50 gallons gross capacity, and put a dipstick tube poking on the port tank, under the lazarette cover, most useful as my new electric fuel gauge soon gave up the ghost (the original or previous owner replacement, I don't know, came to me stuck in "full" position, and I no longer trust electric level gauges, compared to hours and dipstick).
As to cost, I would have to dig into (painful!) archives for that tank, replacement was performed by the yard on labor and materials... But I'll dig if you want to pursue that route.
Date: Wed Aug 15, 2001 10:30 am
Ah, the diesel storage problem is a big one!
I did a couple of transtatlantics on my last boat, and learned to hate jerry jugs. At sea they get in the way, leak, get washed overboard, etc. So on Voyager I added a second tank (in addition to the 40 gallon one under the cockpit sole). The new one is 19 gallons, from the West catalog, and
mounted on the port side just aft of the galley bulkhead. It went in thru the port cockpit locker onto a new shelf I built there, over the water heater and high under the deck.
Now for the weird part: All of the Seawind owners I contacted when buying this boat complained of clogged fuel filters due to corrosion in the main tank. So I plumbed things so the main tank feeds into the new 19 gallon one thru a Racor 500 using a small electric pump. The 19 gallon one feeds the engine thru another Racor 500. There is no way to fill the new tank other
than from the main tank. So everything gets double filtered before hitting the secondary on the engine. In rough weather I have to change the filters after 50 hrs, in nice weather at about 100 hrs, but they seem to solve that problem. The downside is that electric fuel pumps are SLOW... so if the 19 gallon tanks is low it takes hours to fill it. Yet after 3 years and 3 Bermuda trips, Leewards/Virgins, Turks & Caicos, Bahamas, the setup has worked flawlessly.
At 1400 to 1500 RPM I get 4.5 knots or so, but burn only .3 GPH. If I could get all of the fuel out of the tanks that's almost 900 miles in calm seas. At 1700 RPM consumption goes up to about .4 GPH. At 1900 it's .56 GPH. I'm learning the zen of moving slow when at sea... Also, the engine noise is so much quieter at lower RPMs. This year I singlehanded all three legs and
really appreciated the quietness.
The engine is the original Westerbeke 4-91. It's old, has 2500+ hrs, but runs like a top. I think about going to a Yanmar once in a while, but can't stand the thought of a 3000 RPM engine. The real problem with the Westerbeke is really expensive parts!! I was looking at injectors and see
they want $550 each!!! An injection pump is almost $2000. Happily, the previous owner replaced my injection pump and injectors, but a set of all of these is 1/2 the cost of a new Yanmar. Ouch!
Date: Wed Aug 15, 2001 9:12 am
Just want to address the 2nd fuel tank: I no longer have the option as I preeempted your space with an Adler-Barbour Cold Machine refrigeration module which works like a charm (no need for the water-cooling option, I did not need it in the Carib), and my Optima starting battery, plus pumps and water heater. So I'll have to stick with jerry jugs and a siphon (better than trying to pour in rising swells).
On filtering, I have had good success by installing 2 RACOR filters in parallel, arranged so I can switch underway without creating an airlock. With new aluminum tanks, I don't have a scale problem, but have had severe gooing in Tenerife (could be from Lanzarote or Porto Santo-Madeira refueling?, so I religiously add Biobor as I take diesel, even in the US. By the way, I have given up on fuel gauges, and use a dowel stick graduated every inch.
Thanks for your stats on fuel consumption. I did not want to run much lower than 1800 rpm thinking that diesel are not comfortable much below their full speed. But I'll try 1500 rpm on my next long flat days. We have plenty of these in LI sound in the summer, except for weekends when the always hurried stinkpots raise chop... makes me love 5$ diesel/gas!
Date: Fri Aug 31, 2001 10:26 am
From 1991 when I took over her repair project, Sea Quill could be counted upon to almost immediately foul any filters that I could install. Her original primary was a Fram cartridge that held more than a liter of fuel and was mounted in a very inaccessible area to port and just aft of the icebox bulkhead. Within a year I cut the cockpit sole out and removed the tank for repair.
The plywood shelf it rested upon literally survived through no other reason than its long-term diesel fuel saturation. The repair, due to budgetary restraints, was to replace the bottom and two sides of the tank with similar 1/8" Coreten plate. During the dismantling I was to find the layer of goop was nearly 3 inches thick. The plywood was replaced and painted with several coats of alkyd enamel. The Fram was replaced with the more efficient and easier to service Racor at that time as well.
Alas, within one year the fouling was back, as insidious as ever. Racor or not, any seaway stirred up the bottom of the tank so frequently that the new Racor primary could become foul in hours.
In 1996 I cut out the cockpit floor again and removed the offending steel tank. The tank dimensions were faithfully reproduced in a heavy gauge aluminum with a few slight changes. The bottom of the tank had several 1/4" thick aluminum pads welded upon it to lift the bottom tank surface clear of the plywood support, lessening the chances of corrosion from direct contact and galvanic attack. The center of the upper panel of the tank was fitted with a custom made manhole that matched up with a 12" X 15" Bomar access hatch that has been cut into the floor (the teak cockpit grates are modified a bit to assure they are lifted above the hatch). The tank baffles were designed and specifically cut away to allow cleaning by hand or fuel polishing wand through this access. The bolted-on manhole hatch was designed to allow both the feed and return lines to be easily accessed by installing both in the cover as well as a capped tube installed to allow for "sticking" the tank for both gauging as well as monitoring the inevitable Goop. The fuel pick up is suspended fully 3/4 " above the bottom panel at that point and given that the forward-leaning, mounting angle of the support floor assures that most of the residue resides well forward in the tank the margin for inducement to the filters seemed considerably reduced. Of the original 39 gallon capacity the unusable had worked out to be about 2.8 gallons, or just over 7%. The new arrangement has proven to be just over 8% unusable fuel. I am religious about Biobor as well. In 1999 she was to sail/powered to New York from Tortola, with a fuel and rest stop in Bermuda. The Racor was changed in Bermuda and showed very little slime. To date there is only and additional 40.0 hours on the filter and it, once again, shows no trapped sediment.
I have converted the original secondary over from the CAV cartridge to a spin-on unit from ABC Machining. The beauty here is the ability to fill the spin-on with fuel thus eliminating all or most of the bleeding chore. The original location for the CAV, at the back of the Westerbeke, has been relocated to the inboard, vertical bulkhead under the battery box on starboard to be nearer the Racor.
It may seem a bit far to go then but the long run was that I expecting to sail to New Zealand in 1999. To negate battery charging and risk the inevitable "crap-out" while transiting the Panama Canal under power, due to fuel contamination, was far more than I wished to endure at the time.
Date: Thu Aug 30, 2001 4:09 pm
The original steel tanks in these boats seem to have a limited lifetime. We replaced ours after 20 years with an alum. one made the same size as the original steel tank. While the steel tank had not leak, we ask the "fuel scrubber" man to pump the tank to get rid of algae and whatever else had settled in it. After inspection he recommended an immediate replacement. Which we did. Cost was $1,600 done by the yard. To do so they have to remove the mizzen mast support and cockpit locker fore and aft bulkhead on the port side. ( Of course replacing them after installation). We have been most satisfied and notice remarkably cleaner fuel with very little
settiment in the racor bulb. We have sailed this boat in the Caribbean, Florida, and lots of Northern ports and in 20 + years never encountered a fuel stoppage with the racor seporator. There are also two other in line fuel filters ahead of the racor that are changed annually.
Date: Fri Aug 31, 2001 3:21 pm
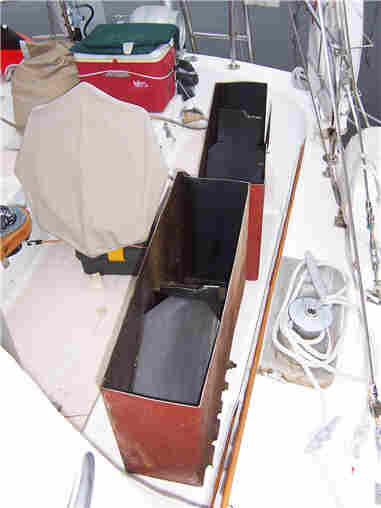
Fuel Tank(s): I felt compelled to replace the aging, scaling Corten steel fuel tank, which was cut into 3 pieces to exit through the port cockpit locker. Loathe to cut the cockpit sole, I chose a new fuel tank made of two identical heavy gauge aluminum tanks extending further aft into the lazarette in order to access the back side where all nipples and lines were located for accessibility, including a dipstick pipe extending to just under the lazarette cover. I have gained precious capacity to 50 gal minus 6% usable.
I also carry six 6 gal jerricans of diesel on deck for passages. Only used them on the New York-Azores leg (2200 N). 80 usable gal give easily the target 500 N minimum autonomy.
The heavy gage U pipe connecting the two tank bottoms is so close to the engine as to not allow a drain plug, a possible problem one of these days, in exchange for a precious ironclad tightness. I count on it as I do not duplicate pick ups et al for each tank, hence the obsession with cleanliness, and the goo scare in Tenerife.
Date: Sat Sep 1, 2001 11:35 am
As far as fuel quantity goes, I added a second tank so carry about 60 gallons. At around 1400 RPM in flat calm seas Voyager does about 4 to 4.5 knots. When the wind died leaving Bermuda this summer I motored 500 miles and still had a surprising amount of fuel left. At these low RPMs I figure 60 gallons will push Voyager 700-800 miles, though I may be scraping the tanks for the last few ounces of diesel!
At 1800 RPM the speed goes up to a bit over 5 knots though fuel consumption goes to .57 GPH. And I never run her over 2000 RPM, using 2000 only for punching into seas. No doubt the Westerbeke would be happy going faster, but I figure the engine needs to be treated gently in her old age.
Date: Sun Sep 2, 2001 2:14 pm
To make it easier to answer several inquiries I have received by private email I'll supply these photos to the entire group as it may be helpful to other supporting members.
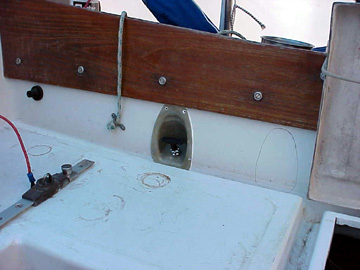
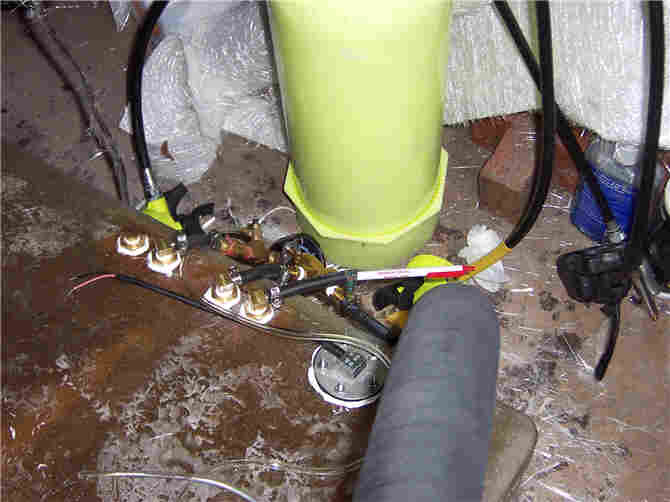
A few of my innovations that may help someone in the future.
The new insert housing for the fuel shut-off cable
January 13, 2006
Howard, Replacing Voyager's Diesel Tank
Ah, the engineer in me wants an optimal solution to the tank problem. So I'm making the tank from fiberglass laid up over a male mold.
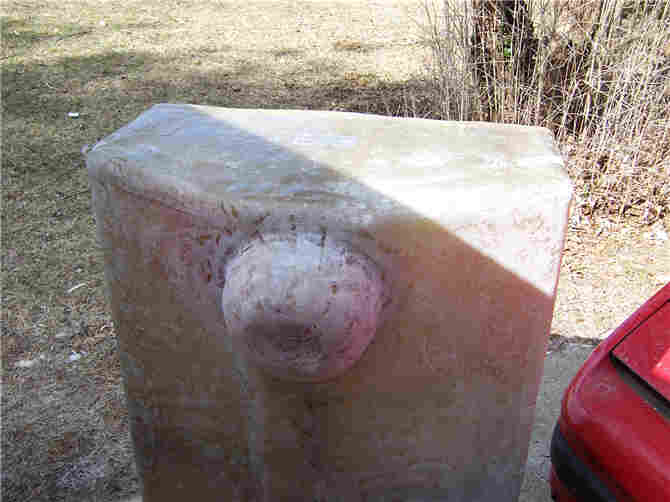
The shape is odd and hard to describe. I'll post pics when I get a little further. But it is about the shape of the original tank, a little narrower so it'll fit down the companionway, and longer and taller. Then the bottom slopes down in two dimensions - that is, it slopes down going forward, and the two sides slope inward. This insures all the fuel and crud flows to a low point. There's a hemisphere 8" in diameter at the low point which is where the pickup is. The pickup is about halfway down into the hemisphere. So all the
water and crud accumulates there, and even on a 15 degree heel the engine can get all but a half gallon from the tank. The current tank seems to have 3 to 5 gallons that's inaccessible, especially when rolling. So the 40 gallon rated capacity is more like 35.
There's a second pickup at the very bottom of the hemisphere that'll be plumbed permanently to a small pump in the cockpit locker. Every time we fill I'll draw off a little fuel into a graduated cylinder to look for water.
The total capacity works out to 59 gallons. At 1400 RPM we get 0.31 GPH, 4 knots in a flat calm sea, that'll be 750 miles of motoring. Not a happy thought, but it sure seems like we've been doing a lot of
motoring lately.
Bert's solution is very appealing as you don't have to yank the engine. But I've got a few things to do to it anyway, and it'll be easier have the engine in the cabin.
I've attached the
drawing
and
my thoughts
on it all, if the files make it through the Yahoo listserver.
Winter, 2006
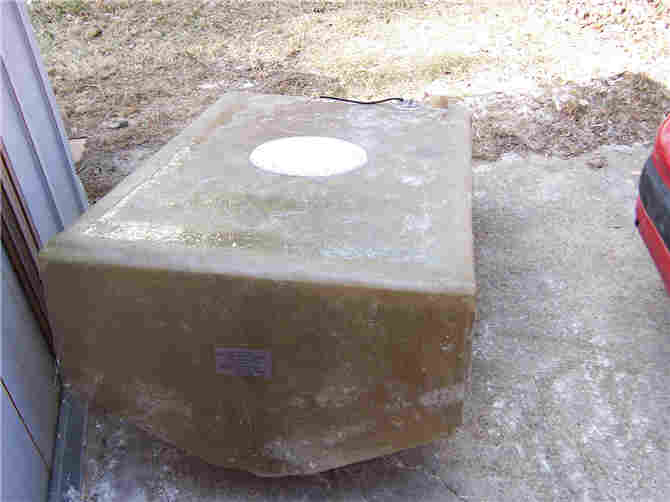
Voyager's fuel tank was the original Corten steel 40 gallon unit. Most Seawind owners report that their old tanks rust internally, quickly fouling the filters. Voyager's was no exception, and I had installed a 19 gallon "day" tank, filled from the main one through a Racor, to ensure clean fuel to the engine. That filter clogged constantly, and was typically hideous after 30 to 40 gallons had been pumped to the day tank.
The outside of the tank looked worse each year. So I decided to replace it over the winter. The first challenge was getting the old one out. Some owners cut out the cockpit sole and removed it in that fashion. My fiberglassing skills aren't up to snuff to make a decent-looking repair when glassing the sole back in. Others have removed it through the port cockpit locker, but the new tank was to be bigger, and had to go in through the engine compartment. So I yanked the engine into the main cabin and set to work. The sawzall made short work of the bulkhead that separates that locker from the tank/engine room. But the tank sits on a shelf that, it turns out, is glassed to the bulkhead. Using a crowbar it wasn't too hard to break the glass.
The tank and shelf immediately sagged. A 2x4 half-way back thwartships that supports the shelf came loose. It was poorly fastened and apparently doing nothing.
The port mizzen support is glassed top and bottom and had to come out. On Voyager the glass was poorly done and coming apart. I loosened the shrouds and jacked up the mizzen step (jacking from a 2x4 across the engine beds), cut the support's glass out, and the thing just fell out. There were no mechanical fasteners.
After that it was just a matter of sliding the tank forward into the cabin. Earlier I had removed half of the bulkhead that separates the engine compartment from the cabin, plus the panel that runs fore and aft between the ladder and the sink cabinet. That space was needed as the tank barely cleared.
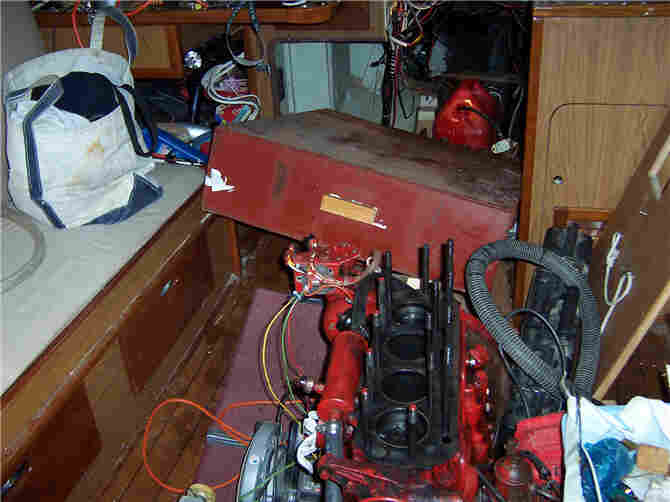
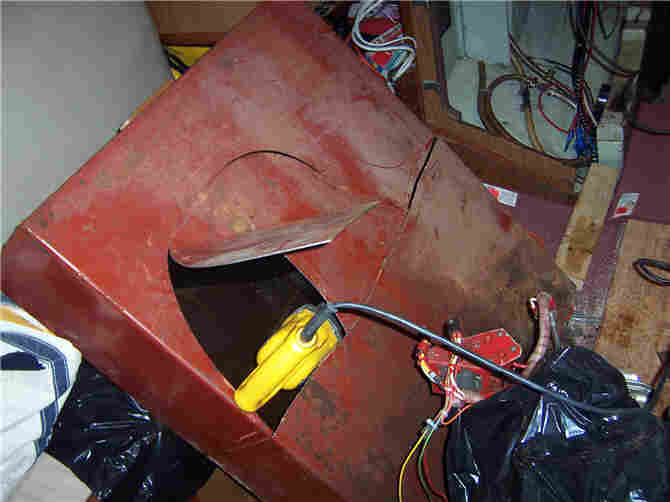
Tank in the cabin. Engine in pieces. Boat a mess.
It doesn't fit out the companionway, so I cut it in two with the sawzall and angle grinder. There are interior baffles welded top and bottom, so I cut an access hole in the tank to get a tool inside to cut through a baffle.
Then I used the sawzall to remove the tank's shelf.
The tank was greasy and rusty... but in surprisingly good condition. There's a lot of metal thickness left. Paul reported 3 inches of scum in his. Voyager's tank was nearly pristine... except for a big mound of sludge right at the fuel pickup line. Yet the filter clogs constantly. I don't understand why the crud collected only at that one point, but speculate that the biocide kept it all in suspension, and it precipitated out due to the vacuum formed when the pump pulls fuel out. But that's just a guess.
My design goals for the new tank were:
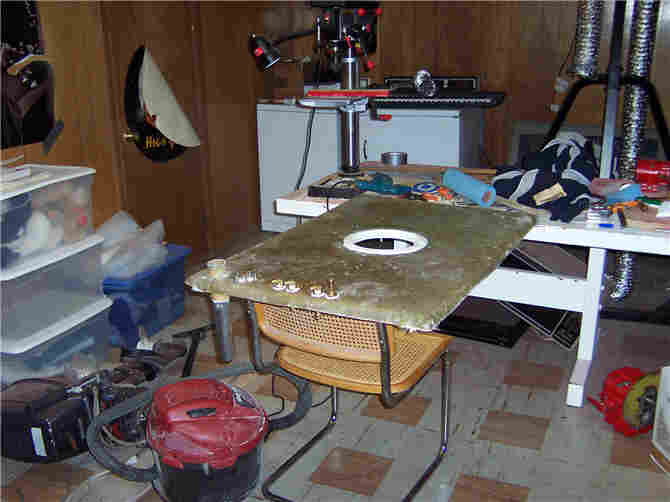
The design evolved over time. CAD drawings here and for the internal baffles here. Note that the bottom of the tank slopes down to the center on both sides athartships, and down to the forward (low) end of the tank. The screwball-looking hemisphere on the bottom is the sump, which can hold a half-gallon of fuel. The pickup is positioned so it can't get the last quart, which is reserved for water and crud. A lower pickup, plumbed to a small hand pump, gets all that.
The tank holds 63 gallons, of which all but the last two quarts are available even on a 15 degree heel . That's enough to motor 750 miles at 4 knots in a flat-calm sea. Since we have to carry two jugs on deck to get fuel at some remote islands, we may as well carry those full, yielding a total range of 870 miles.
I built the thing from fiberglass over a male mold made of medium-density fiberboard... and a metal kitchen bowl for the sump. The odd bottom shape means there's a difficult twist in those pieces which the MDF didn't care to allow. So I ripped 1" wide pieces and assembled the bottom rather like one builds a carvel boat. Two layers of glass went over it all, plus six coats of release wax.
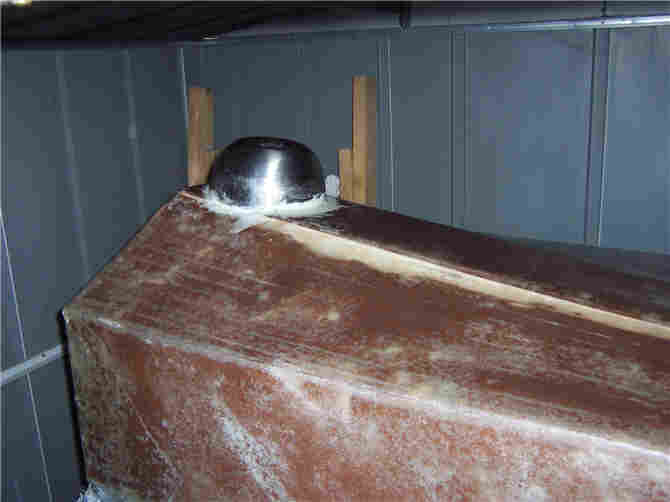
The mold in our shed. Note the strips of 1" wide MDF on the bottom under the glass.
The tank's layup schedule was two layers of 1.5 oz mat, one of 24 oz roving, and two more of mat. All corners are reinforced with extra mat, giving a tank thickness of 0.25" to 0.38", using a total of 8 gallons of polyester resin ($17/gallon from Merton's) and 45 feet of 60" wide mat. Of course, it was winter which means the resin wouldn't care to set properly. So I used four times the normal amount of hardener, but pre-chilled the resin so it wouldn't set up too quickly in the pot. Marybeth was sort of surprised one day to find the stuff in the freezer.
There are more technical details here, including part numbers of various components.
The tank, baffles in place.
On the right, the top ready to be attached.
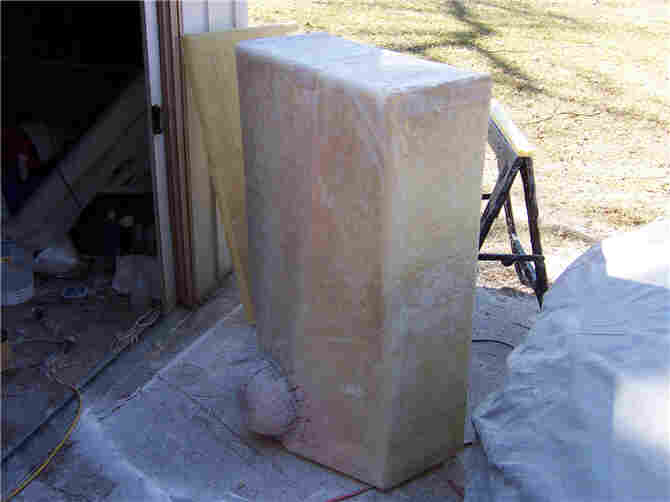
Various view of the beast.
Pressure testing to comply with ABYC rules, using a scuba tank and gauge. At 3.5 PSI there's about 6000 pounds of force on the top. It made horrible creaking noises but didn't leak. Don't try this at home.
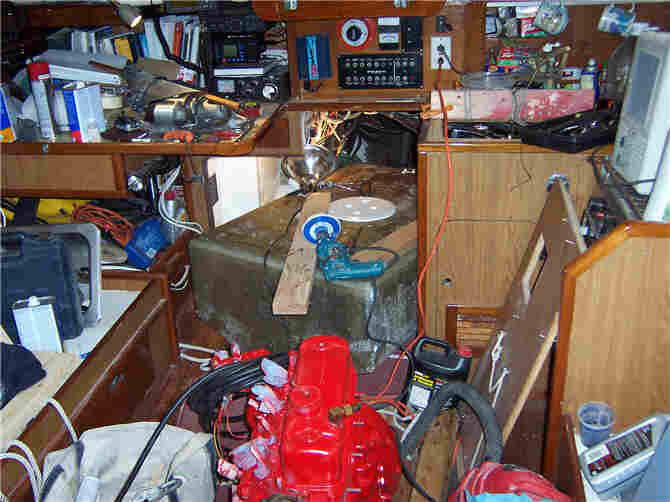
In the main cabin, soon to be pushed aft into the engine compartment. Boat still a mess.
After far too many hours, the tank is now installed, the engine is back in place, as are the port bulkhead and mizzen support. There's only 15 gallons of diesel in it at the moment, but it functions properly.
Since the engine had to come out, I had the starter, injectors and injection pump rebuilt. The head went to a head shop (not that kind!) where it was cleaned, magnafluxed, and the valve seats reground. New engine mounts and hoses, plus a paint job followed.
It was a much bigger effort that I'd imagined.
7659 Jul 29, 2007
I am having a company called Petro Scrub come down to the boat to clean out the tank. The operator asked if I knew in which direction the baffels ran. I really can't seem to tell by looking at the tank. Does anyone have any idea? I know Jack took out and cut his apart to get it out so he should have a pretty good idea of what the inside looks like. Jack?
George, Mandala 83
7660 Jul 30, 2007
George,
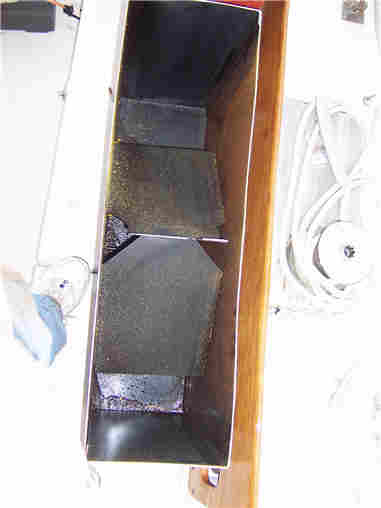
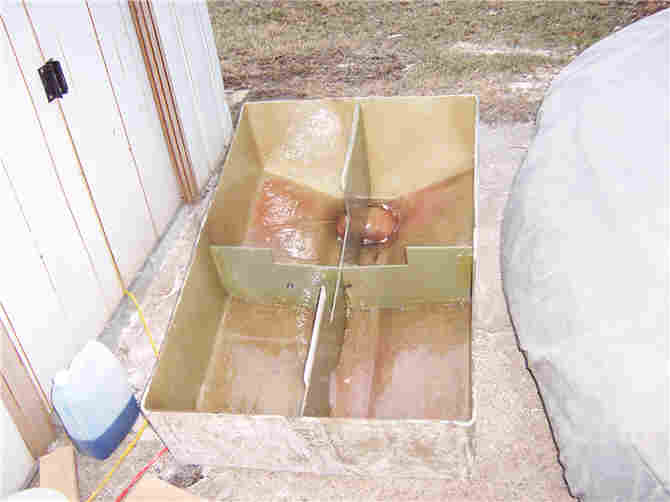
The baffle in my tank was X shaped - it ran from each corner to an intersection in the middle. Hopefully these pics will show this. If the goal is to snake a pipe between baffles it will have to go under the limber hole in the center of the tank.
Jack 057K Voyager